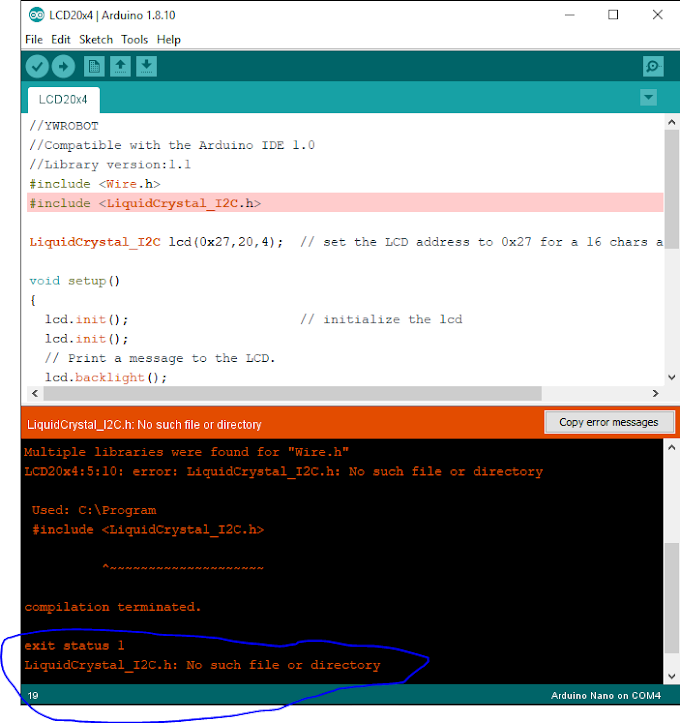
Cara Menginstall Board STM32 Pada Arduino IDE

Untuk menginstall board stm32 pada arduino ide, sehingga stm32 dapat di program melalui arduino ide sebagai berikut:
- Install arduino IDE terlebih dahulu. Jika sudah ada, maka lanjut ke langkah kedua
- Download board stm32 terlebih dahulu. Linknya ( https://github.com/rogerclarkmelbourne/Arduino_STM32 ) Jika sudah masuk ke web, klik tombol yang warna hijau tulisannya "Clone or Download" kemudian pilih "Download ZIP" maka akan mendownload secara otomatis.
- Setelah selesai mendownload, copy file tadi ke folder "C:>Program Files(x86) > Arduino > hardware.
- Ekstrak file yang tadi, kemudian masuk ke folder > Arduino_STM32-master > drivers > win. Jika sudah masuk, maka double click pada file "install_drivers.bat" ikuti langkah-langkahnya.
- Jika sudah selesai maka proses install sudah selesai juga. STM32 anda bisa diprogram memakai Arduino IDE.
To install the STM32 board on "Arduino Ideas", so STM32 can be programmed through "Arduino Ideas" as follows:
- Install "Arduino IDE" first. If it already exists, then proceed to the second step
- Download the STM32 board first.
https://github.com/rogerclarkmelbourne/Arduino_STM32 - After downloading, copy the file to the folder
"C:>Program Files(x86) > Arduino > hardware. - Extract the file, then enter the folder > Arduino_STM32-master > drivers > win. if it is already, double click "install_drivers.bat" and follow step by step.
- The STM32 Board is installed.
To see the install tutorial video you can see the video below:
Kerjasama:
https://linktr.ee/robotikid
Youtube: https://www.youtube.com/robotikid
Instagram: https://www.instagram.com/robotikid/
Facebook: https://www.facebook.com/RobotikID/
Website: https://www.robotikindonesia.com/
Tokopedia: http://tokopedia.com/instrumentrobot